Dumps are optional but routinely used in sites. Dumps have the following properties:
Name- the name of the dump as it appears in XECUTE reports, Data Feed Out and configuration tables.
Spatial Domain - the spatial domain to assign the dump to. By default a dump will use the system Default Domain.
Accumulation Field - is set to Mass by default and is used to fill the Capacity, but can be set to any principal field that has a Sum Aggregation when dump solids are not used. If dump solids are used then the property is set to the swollen volume (Volume_Swollen principal field).
Capacity - enter a mass of the dump capacity. If dump solids are used, the capacity is a read-only field showing the volume of the imported dump solids.
Inventory - if dump solids are not imported an Inventory property appears so that reconciliation points can be created to record the dump material properties at a set point in time. The default reconciliation values are set to zero. See Capacities and inventory.
Material - sets the material type flowing into the dump and reported in the closing balance report for the dump.
Stack Rate sets the rate of material sent to the dump.
Type - stack rate can be Unlimited or Limited by the value set in Maximum field.
Maximum - field is enabled if stack rate type is set to Limited, enter the maximum rate.
Override per period - the stack rate can be overridden per period. Configure the overrides by clicking the dial icon and enable the overrides by selecting the Yes option for the field.
Dump Time Penalty - if a haulage model is imported into the site this field is enabled, it allows custom dump times to be applied. The penalty is in addition to the Dump time configured in Site Management.
Domain Name (Named Location) - the named location in the haulage model associated with the dumps spatial domain (Set in General > Spatial Domain) that corresponds to the dump node. For single spatial domains the Default Domain is used.
This field is NOT available if dump solids are used, as the solids reference point is used as the spatial location.
Solids Colour - the colour of the imported dump solids. Use the drop-down for a list of colours, and the ellipsis button to set the transparency and a wider range of colours.
The Add Solids button is used to import dump solids, visualise and set the filling order of the dump solids. The button name changes to View/Edit once dump solids are imported.
If haulage is enabled for a site, individual dump solids (dump blocks on a lift) can be imported as destinations for use in dump planning. For travel time calculations, the source is the activity area centroid and the destination is the imported dump solid slice centroid. See Site Configuration > Haulage model for details on slice configuration.
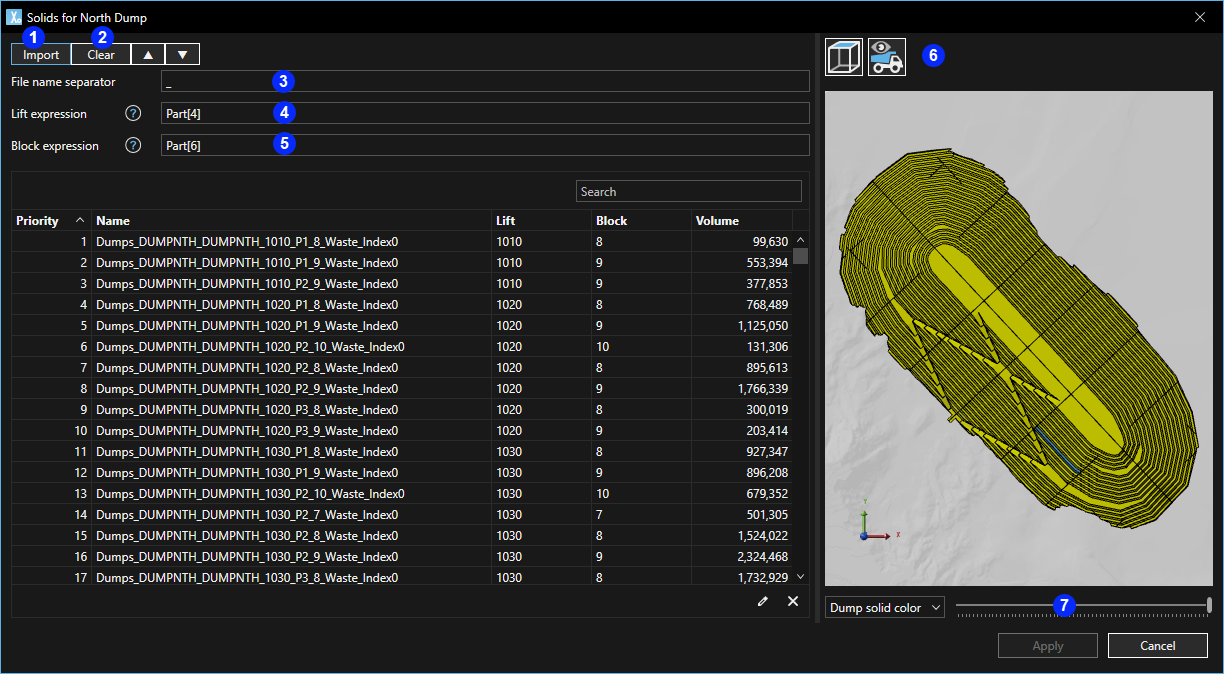
Click the Add Solids button to open the import panel:
If a dump solid cannot be imported, or is invalid, a warning will display and the solid import will be skipped.
Each column in the dialog has filter and sort controls to control the preview.
The filter controls only affect the preview window - all valid solids in the folder will be imported into XECUTE.
To check the filling order and visualise the dump nodes click the haulage icon (6) and move the slider at the base of the preview window.
| Item | Description |
|---|---|
| 1 | Click to import folder that contains the dump solids. |
| 2 |
|
| 3 | Split the file Name on this character. [Example '_']. |
| 4 | Use the fourth name part as lift name [Example 'Part[4]']. |
| 5 | Combine fifth and sixth name parts to make the block name. [Example 'Part[5]_Part[6]']. |
| 6 | Show or Hide haul routes. Haul routes are visible if a haulage file has been imported into the site. |
| 7 |
|
Once configured, the filling of dumps can be visualised in XECUTE as the schedule is animated. The waste material will flow from source nodes to destination nodes (dump solids) and progressively fill (render) the dump solids.